As an architect my core responsibility is to look over improving the quality of software delivery. One of the core aspect of keeping the quality is code reviews. I am always inclined and insistent upon offline manual code reviews. But in distributed teams and large settings, it is highly difficult to keep up the pace of development that happens over the week or even day by day. Another aspect of it is on organizational level, the consistency of manual code reviews are difficult to keep up. Also, there is particular focus area for each code review likes of systems components written in different programming languages,performance, maintainability, security, unit testing or design reviews etc. I have seen many mid and small organizations still struggling for later part of institutionalizing delivery quality across the projects or products.
My quest for institutionalizing software quality landed me onto SonarQube (also reffered as “Sonar”) platform. It is open platform to manage code quality. It is developed with JAVA but fairly easy to install and use. It also works in an enviornment where system is made of different components which are written in different prorgamming languages. I have been using SonarQube from last two years and pretty happy with the results of it. It is one of the tool which greatly helps to bring in the much needed change in entire organization or product towards technical quality and engineering.
Without much ado, let’s see how you can get your hands on with SonarQube and help your organization to setup code quality platform. We are going to use SonarQube 5.0.1 version.
SonarQube Installation and Configuration
Pre-requisites
1. Download and install Java JDK 1.7. Check your operating system version whether it’s 32 bit or 64 bit and select the appropriate package. This is important since based on JDK version, we need to select SonarQube installation package.
Url: http://www.oracle.com/technetwork/java/javase/downloads/java-se-JDK-7-download-432154.html
2. Set JAVA_HOME to c:\ as shown in following snapshot. Make sure, to set it into “User Variables” section as well as in PATH variable under “System Variables”.
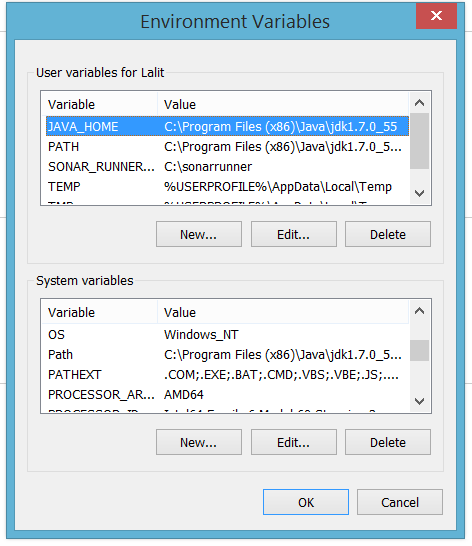
Environment Variables
Please DO NOT FORGET to restart your system after creating/changing/editing or modifying any environment variable entries.
Download following software/libraries
FxCop 10
StyleCop 4.7.49.0

System Properties Window
OpenCover 4.5.3522
https://github.com/OpenCover/opencover/releases/download/4.5.3522/opencover.4.5.3522.msi
Please note, while installing OpenCover choose advance option and select to install for “all users”. Set the installation path to C:\Program Files (x86)\OpenCover. With default options openCover installs under c:\users\<your username>\
SonarQube v.5.0.1
http://dist.sonar.codehaus.org/sonarqube-5.0.1.zip
Extract the zip to c:\sonar
Sonar Runner v. 2.4
Extract the zip to c:\sonarrunner.
And create new Environment variable under User variable name as “SONAR_RUNNER_HOME” and set its value to “C:\sonarrunner”
Also, edit path variable under “System Variables” and append value “; C:\sonarrunner\bin;” as shown in following snapshot.
Please DO NOT FORGET to restart your system after creating/changing/editing or modifying any environment variable entries.
Download Sample Project
https://github.com/SonarSource/sonar-examples/archive/master.zip
This has various sample projects for sonar which are good for demo purpose. Extract the zip anywhere and since we are only interested with .net projects, take CSharp folder and copy to C Drive i.e. your project is at “c:\csharp”
To run sonarQube Server
1. Go to “C:\sonar\bin” folder. According to version of your OS, choose appropriate folder. For example, I am running Windows 8.1 64 bit OS so I have chosen “windows-x86-64” folder. If you are working on Windows XP 32 bit edition, choose “windows-x86-32” folder and open it.
2. From Command Prompt Run “StartSonar.bat”. This will keep SonarQube server running. If everything goes smoothly, you will see prompt like

StartSonar.Bat
If you face any error at this stage, please check whether you have selected correct JDK version (32 bit/64 bit) installation. Also, verify all environment variables are correct or not.
Now, you can visit, http://localhost:9000 and you will be greeted with default SonarQube page. Login there using “admin/admin” credentials. Keep the command line SonarQube process running so as long you want to run the server.
Configuring C# Plugins and mapping Paths
1.Once you login, go to Update Center by navigating to following path. On Top right corner, select Settings->(on left navigation pane) System ->Update Center->Available Plugins
Install the plugins mentioned in following snapshot. You will see install button once, you click on the plugin name. For example, below screenshot come for JAVA.

Java SonarQube Plugin Installation

Sonar Dashboard
2. After Installation, now, we need to set the plugin [Tools like FxCop, StyleCop and OpenCover] local paths. So, navigate to, Settings->General Settings->Select Category C# ->Code Analysis/C#
3. Set “Path to FxCopCmd.exe” to “C:/Program Files (x86)/Microsoft Fxcop 10.0/FxCopCmd.exe” and save the settings.
4. Now, click on Rules menu once you click on Activate in->select the “Sonar Way “Quality profile. If you don’t see any profile in the dropdown, make sure to set the “Sonar Way” profile as default Quality profile under Quality profile tab.

SonarQube Quality Profile
How to Run SonarQube
SonarQube works on concept of server and client. Each project/Solution/Codebase has its client settings file called as “sonar-project.properties” file. It is a convention and best practice to keep this file in the same folder as that of visual studio solution file.
We need to author this “Sonar-project.Properties” file for each visual studio solution.
Running Code Qualtiy Analysis for sample Project
1. Now, from command prompt navigate to “C:\csharp” and execute the command “sonarrunner”
2. This will take few minutes and give you execution Success message at the end. If there are errors, you can rerun the process “Sonarrunner –e” to view the errors.
3. Now, browse to http://localhost:9000/ and select “CSharp Playground” to view the dashboard for sample project. Dashboard should look like as shown below.

Sonar Final Dashboard
Please note that, for this post, I have configured bare metal SonarQube. As you keep analyzing specified codebase again in future, it will also show you comparisons and trends and lot more data than displayed in above diagram. There is great plugin ecosystems that gives you various perspectives on your codebase through SonarQube Plugins. For more interesting statics and demo, you can also visit to http://nemo.sonarqube.org
Things To Do After SonarQube Code Quality Analysis
Please be mindful that SonarQube gives much needed platform for code quality but do not fall into pray of being only number obsessed.
Code Quality is journey towards technical excellence and SonarQube platform or Sonar Code Quality index gives one of the important perspective towards it.